
Table of Contents
- Why Canvas Adhesive Quality Matters for Long-Term Results
- Types of Adhesives for Canvas: Choosing the Best Glue for Canvas
- How to Glue Canvas: Proper Application Techniques
- Canvas Adhesive Problems: Common Issues and Solutions
- Flexible Fabric Glue: When and Why It Matters
- Chemical Interactions and Environmental Factors
- Investing in Quality: Why Premium Adhesives Deliver Real Value
- Conclusion
Last Updated: July 20, 2026
Why Canvas Adhesive Quality Matters for Long-Term Results
Canvas adhesive quality directly determines whether your artwork survives decades or deteriorates within years. Low-quality adhesives introduce hidden risks that compound over time: warping, buckling, and permanent damage that becomes irreversible once it occurs. The cost of replacing a damaged artwork far exceeds the modest premium you'd pay for quality adhesive from the beginning.
Conservation standards for archival materials establish clear guidelines for adhesive selection in professional art settings. Museums and conservators consistently choose pH-neutral, acid-free products because they understand the chemistry behind long-term preservation.
The cost of low-quality adhesives
Budget adhesives create a false economy. Generic fabric glue at half the price of professional-grade options inherits multiple problems: fillers, plasticizers, and solvents that break down under humidity, temperature fluctuations, or UV exposure. When your canvas buckles after six months or drills pop off a diamond painting, you've already invested hours of work. Replacing it means starting entirely from scratch.
Professional-grade adhesives cost more because they use superior binders, appropriate viscosity for canvas application, and formulations that maintain flexibility as materials expand and contract. The chemistry matters.
How adhesive quality affects dimensional stability
Dimensional stability is the ability of your canvas and adhesive system to maintain consistent size and shape as temperature and humidity change. High-quality adhesives are formulated to cure at predictable rates with minimal shrinkage and maintain flexibility after curing, allowing the canvas substrate to expand and contract naturally without the adhesive becoming brittle or cracking.
When you pair a substrate with an incompatible adhesive, you create a mismatch in how these materials respond to humidity and temperature. An archival-quality adhesive is engineered to work with common art substrates without creating internal stresses. The pH-neutral formulation ensures the adhesive won't chemically interact with your canvas or mounting materials over time, preventing yellowing, brittleness, or adhesion failure.
Types of Adhesives for Canvas: Choosing the Best Glue for Canvas
The market offers several categories of adhesives for canvas work, each suited to different applications and longevity requirements.
Waterborne vs. solvent-based adhesives
Waterborne adhesives use water as the primary carrier, making them non-toxic, low-odor, and safer to use. They provide adequate bond strength, cure predictably, and eliminate health concerns. The curing time is slightly longer than solvent-based alternatives, typically 24-48 hours for full cure, but this extended timeline actually reduces warping risk by allowing more gradual moisture loss.
Solvent-based adhesives use organic solvents to dissolve and carry adhesive compounds. They cure faster but release volatile organic compounds (VOCs) during application and curing, requiring proper ventilation. For canvas work, waterborne adhesives now represent the best choice for most artists.
EPA guidance on solvent emissions and indoor air quality documents the health impacts of VOC exposure in creative spaces. Professional studios increasingly specify waterborne products to protect artist health while maintaining work quality.
:::pro-tip Waterborne adhesives work best when you maintain consistent temperature and humidity during the curing period. Avoid drafts, direct heat, and rapid humidity swings while the adhesive sets. :::
Archival-quality and pH-neutral options
Archival-quality adhesives are formulated to remain stable for 100+ years without yellowing, brittleness, or chemical degradation. pH-neutral formulations maintain a neutral pH (around 7.0) throughout their lifespan, preventing chemical reactions between the adhesive and your canvas or mounting materials.
For serious artists and anyone creating work intended for long-term display or sale, archival-quality adhesives are non-negotiable. The modest cost premium, typically 2-3x the price of standard fabric glue, is negligible compared to the value of preserving your artwork. Conservation professionals consistently specify archival products because they understand the consequences of adhesive failure.
How to Glue Canvas: Proper Application Techniques
The best adhesive loses its effectiveness if you apply it incorrectly. Proper technique ensures even coverage, adequate bond strength, and predictable curing that minimizes warping and delamination risk.
Surface preparation and substrate compatibility
Before applying any adhesive, prepare your canvas and substrate surfaces to ensure maximum adhesion. Remove dust, debris, and loose fibers using a soft brush or compressed air. For canvas with a gesso primer, light sanding with fine-grit sandpaper (220-grit or higher) can improve adhesive bite without damaging the primer layer.
Substrate compatibility is critical. Different materials, foam core board, museum board, canvas, wood, have different surface properties that affect how adhesive wets and bonds. Test your adhesive on scrap pieces of the exact substrates you'll be using before committing to a full project.
Temperature and humidity during application matter significantly. Most adhesives perform best when applied between 60-75°F and 40-60% relative humidity. Avoid applying adhesive in direct sunlight or near heat sources, which accelerate curing unevenly and increase warping risk.
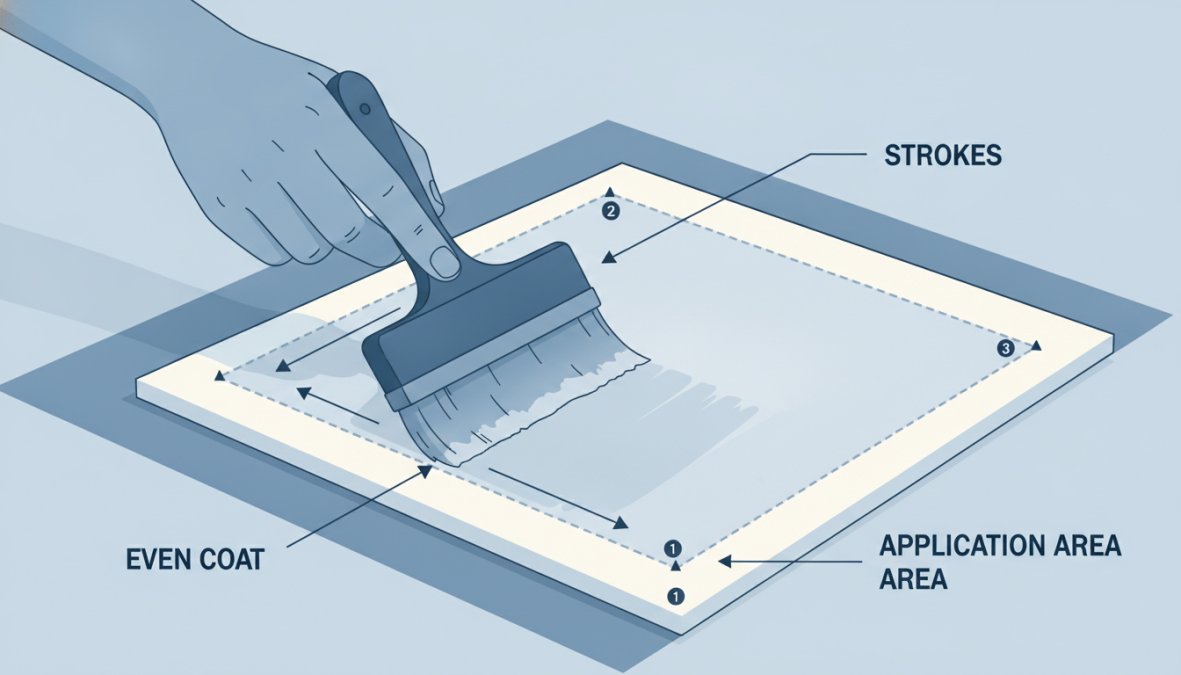
Application methods for smooth, even finishes
Apply adhesive in thin, even coats rather than one thick layer. A thin coat dries more uniformly and creates less warping stress. Work in one direction initially, then cross-hatch with perpendicular strokes to ensure even distribution.
For large canvases or foam core mounting, a roller can distribute adhesive more evenly than a brush, reducing the risk of thick spots or thin areas. Foam rollers work particularly well with waterborne adhesives because they don't shed and distribute the product uniformly.
The goal is consistent, thin coverage, not maximum adhesive volume.
Curing time and bond strength development
Waterborne adhesives typically require 24-48 hours for full cure, though they develop usable bond strength within 2-4 hours. Never move or stress a freshly bonded canvas until the full curing period has elapsed.
Bond strength develops gradually as the adhesive dries and the binder hardens. Full strength arrives only after complete curing, when all moisture has evaporated and the binder has fully polymerized. If your studio is cold or humid, extend the recommended curing time by 25-50% to ensure complete bond development.
Canvas Adhesive Problems: Common Issues and Solutions
Understanding common failure modes helps you avoid them or address them quickly if they occur.
Warping, buckling, and delamination
Warping occurs when adhesive shrinks unevenly or when the adhesive layer becomes too rigid, preventing the canvas from expanding and contracting naturally. Use quality adhesive in thin, even coats and allow adequate curing time in stable environmental conditions. If warping has already occurred, the damage is typically permanent.
Buckling manifests as visible waves or ridges in the canvas surface, usually appearing within days or weeks of adhesive application. This happens when the adhesive cures unevenly or when the canvas was exposed to humidity changes before the adhesive fully cured. Once buckling occurs, removing the canvas and starting over with better adhesive and technique is usually necessary.
Delamination is the separation of the canvas from the substrate beneath it, typically resulting from inadequate surface preparation, incompatible adhesive and substrate pairing, or moisture exposure. If caught early, you can sometimes inject new adhesive into the gap and re-clamp the canvas.
Poor adhesion and premature failure
Poor adhesion results from inadequate surface preparation, dust or contaminants preventing the adhesive from wetting the substrate properly, or incompatibility between adhesive and substrate materials. Premature failure occurs when an apparently good bond deteriorates within months or years, typically indicating use of a non-archival adhesive that breaks down over time.
The solution is selecting a quality, archival-grade adhesive and following proper application technique. If you've already experienced adhesion failure, analyze what went wrong: Was the adhesive appropriate for your substrates? Was surface preparation adequate? Were environmental conditions stable during curing?
Flexible Fabric Glue: When and Why It Matters
Flexible fabric glue is specifically formulated to remain pliable after curing, accommodating the movement and flex inherent in fabric-based work. This flexibility is essential for textile bonding, collage applications, and any project where the canvas or substrate will experience mechanical stress.
Textile bonding and collage applications
Textile bonding requires an adhesive that won't crack or fail when the fabric flexes, stretches, or experiences repeated movement. Standard rigid adhesives become brittle on fabric and fail under stress. Flexible fabric glue maintains elasticity after curing, moving with the fabric rather than resisting and eventually breaking apart.
For diamond painting and similar drill-on-canvas applications, flexible fabric glue is essential. The drills must remain bonded even as the canvas flexes during framing, transportation, and display. Flexible formulations keep drills secure through years of handling and environmental changes.
Viscosity and coverage considerations
Viscosity must match your application method and substrate. Thin, low-viscosity adhesives flow easily and work well for brushing or rolling, but may seep through thin fabrics. Thick, high-viscosity adhesives provide better control but require more effort to apply evenly.
Coverage depends on substrate porosity. Absorbent materials like unprimed canvas require more adhesive to achieve adequate bond strength. Non-absorbent substrates like sealed wood require less adhesive. Test coverage on scrap materials before committing to your full project.
Chemical Interactions and Environmental Factors
The chemistry of your adhesive and how it interacts with your canvas and environment determines long-term stability.
How humidity and temperature affect adhesive performance
Humidity directly affects adhesive curing because waterborne products rely on water evaporation to harden. In humid conditions, water evaporates slowly, extending curing time and increasing the risk of uneven curing that leads to warping. Very dry conditions accelerate evaporation, which can cause rapid shrinkage and dimensional instability.
The ideal range for most waterborne adhesives is 65-75°F with 45-55% relative humidity, conditions that allow predictable, even curing without excessive shrinkage. Quality archival adhesives maintain their properties across temperature and humidity ranges typical of indoor environments. Low-quality adhesives become brittle in cold conditions, sticky in warm conditions, and degraded by UV exposure.
Store adhesives in cool, dry conditions away from direct sunlight. Freezing temperatures can damage waterborne adhesives by disrupting the emulsion, so avoid storing in unheated garages or outdoor spaces during winter.
Reversibility and conservation considerations
Reversibility is the ability to remove an adhesive without damaging the substrate, a critical consideration for conservation and museum work. For artwork intended for museums or long-term institutional care, reversibility can be important. However, for personal artwork and commercial applications, reversibility is usually less critical than durability and permanence.
American Institute for Conservation standards on adhesive selection provides detailed guidance on reversibility and conservation-grade adhesive choices.
Investing in Quality: Why Premium Adhesives Deliver Real Value
The price difference between budget and premium adhesives seems significant until you factor in the true cost of failure. A quality adhesive costs a few dollars more per project but eliminates the risk of losing weeks or months of creative work.
Cost-per-square-inch analysis and longevity
Calculate the true cost of adhesive by dividing the product cost by the coverage area. A premium adhesive at $15 per quart covering 100 square feet costs $0.11 per square foot. If a budget adhesive fails on a 2-square-foot canvas you've spent 20 hours completing, the cost of failure includes the lost work hours plus the cost of new materials to start over. At any reasonable value for your creative time, the $5 savings on adhesive is trivial compared to the cost of failure.
Longevity directly impacts cost-per-year of ownership. An adhesive that fails after 5 years costs more per year than one that lasts 50 years, regardless of the initial purchase price. When you buy quality adhesive, you're buying decades of stability and reliability.
Professional-grade adhesives for serious artists
Professional-grade adhesives are formulated and tested to standards that exceed hobby-level products. They come with documentation of pH levels, archival ratings, viscosity specifications, and cure times. Professional products are also manufactured with tighter quality control, meaning consistency from batch to batch.
Serious artists invest in professional-grade materials across all categories. This consistency in quality compounds across the entire project, resulting in artwork that looks and performs better.
Canvas adhesive quality directly determines whether your artwork survives decades or deteriorates within years. The choice between budget and premium adhesives is ultimately a choice between short-term cost savings and long-term value preservation. Choose archival-quality, pH-neutral adhesives, follow proper application technique, and protect your artwork with the same care you invested in creating it.
Frequently Asked Questions
What makes a good adhesive for canvas, and why does canvas adhesive quality matter so much?
A quality canvas adhesive must provide strong, lasting bond strength while maintaining flexibility to prevent warping and buckling. Premium adhesives are pH-neutral and acid-free, ensuring your work remains vibrant and stable for decades. Poor-quality adhesives fail prematurely, causing drills or fabric to pop off and compromising your entire project. Investing in archival-quality adhesives means your finished canvas maintains dimensional stability and resists environmental stress that causes delamination.
How do I choose between waterborne and solvent-based fabric glue for my canvas project?
Waterborne adhesives are non-toxic, easy to clean, and ideal for most canvas applications, they're the preferred choice for hobbyists and professionals alike. Solvent-based options offer faster curing and superior waterproof properties but require ventilation and careful handling. For canvas mounting and textile bonding, waterborne professional-grade adhesives typically provide the best balance of safety, performance, and ease of use. Consider your substrate compatibility and curing time needs when deciding which best glue for canvas fits your workflow.
What are the most common canvas adhesive problems, and how can I prevent them?
The most common issues are warping, buckling, and poor adhesion caused by inadequate surface preparation or using low-quality adhesives. Prevent these by cleaning and priming your substrate, applying adhesive evenly with proper viscosity, and allowing full curing time before handling. Using archival-quality, pH-neutral adhesives dramatically reduces failure rates. Environmental factors like humidity and temperature also affect bond strength, store materials in stable conditions and follow manufacturer curing guidelines to ensure lasting adhesion and prevent canvas adhesive problems.
Can I repair a canvas project if the drills or fabric start popping off?
Yes, but prevention is far easier than repair. If adhesion fails, carefully remove the loose elements and re-adhere using a reversible, professional-grade adhesive. Reversibility matters in conservation work because it allows future restoration without permanent damage. For diamond painting and collage work, using high-quality flexible fabric glue from the start prevents this issue entirely. If you're working with archival or valuable pieces, consult conservation standards and consider acid-free, pH-neutral adhesives that maintain reversibility for potential future repairs.
This article was written using GrandRanker