
Table of Contents
- Why Seal Your Finished Diamond Painting
- Materials and Tools You'll Need to Seal Diamond Paintings
- How to Prepare Your Canvas Before Sealing
- Step-by-Step Process: How to Seal Diamond Paintings
- Best Way to Seal Diamond Paintings: Comparing Methods
- What to Use to Seal Diamond Painting: Sealer Selection Guide
- How Long Does Diamond Painting Sealant Take to Dry
- How to Frame a Sealed Diamond Painting
How to Seal Diamond Paintings: Step-by-Step Guide
Last Updated: July 25, 2026
Sealing finished diamond paintings protects your artwork and preserves the sparkle of carefully placed drills. At Jeanne Argent Atelier, we've guided countless artists through the finishing process. Without a protective coating, dust accumulates between drills, colors fade from UV exposure, and canvas yellows within months. A quality sealant locks drills in place while blocking UV rays and moisture.
Why Seal Your Finished Diamond Painting
Sealing protects against environmental damage. The canvas is vulnerable to yellowing from sunlight, and water-based adhesives can reactivate if exposed to humidity, causing drills to loosen. A sealant creates a barrier that blocks UV rays and moisture while giving your work a polished, professional appearance. A glossy finish enhances sparkle and depth, while matte provides a subdued, elegant look.
Materials and Tools You'll Need to Seal Diamond Paintings
Sealer Options: Mod Podge, Acrylic, and Spray Alternatives
Mod Podge is the most popular choice, affordable, widely available, and easy to apply with a brush. It dries clear but requires careful application to avoid brush marks and takes 24 hours to fully cure.
Water-based acrylic sealers designed for diamond paintings offer similar protection with formulations that minimize brush marks and dry faster (4-6 hours), allowing same-day second coats. They're non-toxic and safe for indoor use.
Spray sealants provide the most even coverage with minimal brush marks, creating uniform finishes without streaking. They require proper ventilation but are ideal for experienced applicators.
Resin-based sealers offer superior UV protection and durability but require careful handling due to fumes and longer curing times (24-48 hours). Reserve these for high-value pieces.
Eco-friendly alternatives include plant-based acrylic sealers and non-toxic water-based options that reduce environmental impact without compromising protection.
Application Tools and Preparation Supplies
Use a foam brush or soft-bristled paintbrush for brush-on sealers; foam brushes create fewer marks. You'll need a lint-free cloth to prevent fibers from embedding in wet sealant. A heat gun or hairdryer on low setting helps smooth air bubbles and accelerate drying. A roller or squeegee presses down shifted drills and ensures even contact. Protective equipment includes gloves and a dust mask for spray applications. Work on a clean, flat surface covered with kraft paper to catch drips.
How to Prepare Your Canvas Before Sealing
Inspect your canvas for loose drills and use a roller or squeegee to press them down with gentle, even pressure. Clean the surface thoroughly with a lint-free cloth, wiping away dust and adhesive residue without pressing hard.
Check for missing drills. Small gaps (1-2 drills) are normal; larger gaps can be filled with matching drills if you have extras. Once sealed, gaps become permanent, so decide before applying sealant.
Allow the canvas to rest 24 hours after completing the painting. This gives adhesive time to fully cure and locks drills in place before sealing.
Step-by-Step Process: How to Seal Diamond Paintings
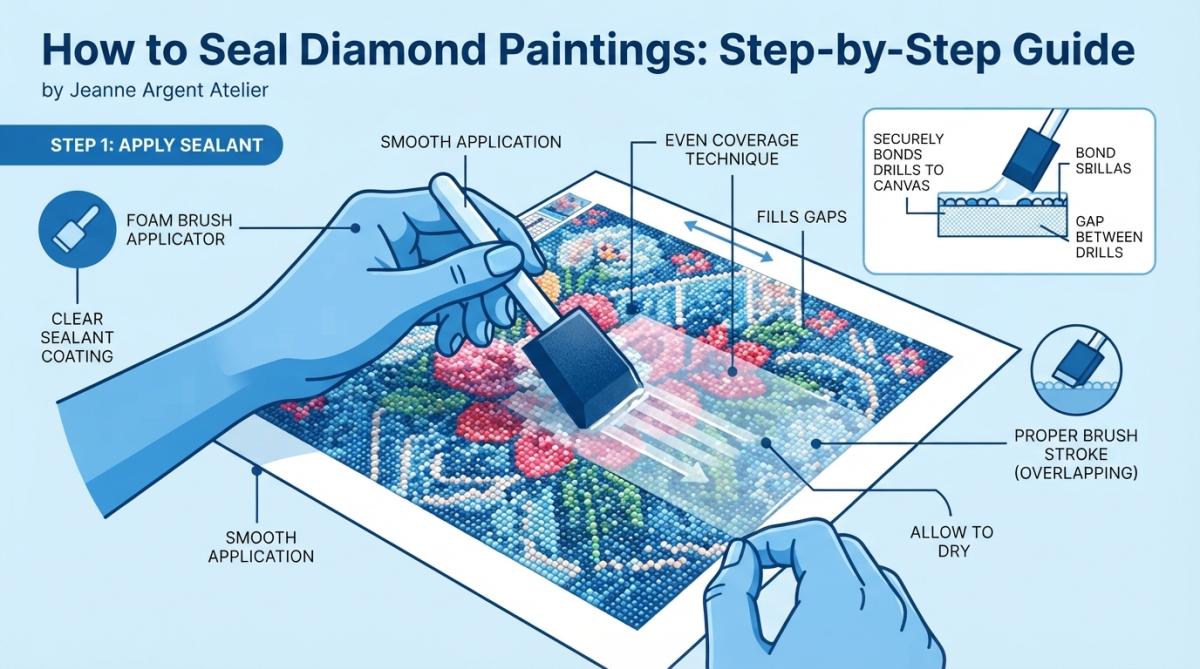
Step 1: Choose Your Environment (5 minutes) Work in a clean, well-ventilated space with temperatures between 60-75°F and humidity below 50%. Avoid direct sunlight, which causes uneven curing.
Step 2: Prepare Your Sealant (2 minutes) Stir gently for 30 seconds, don't shake vigorously, as this creates air bubbles. If too thick, thin slightly with distilled water (1 part water to 4 parts sealer).
Step 3: Apply the First Coat (10-15 minutes) Dip your foam brush and apply thin, even strokes in one direction, then use light perpendicular strokes to blend. Avoid pressing hard, which dislodges drills. Aim for a thin, translucent coat.
Step 4: Remove Air Bubbles (5 minutes) Use a heat gun on low or hairdryer on cool, held 6-8 inches above the canvas, moving slowly. Gentle heat helps bubbles rise and pop.
Step 5: Allow First Coat to Cure (4-24 hours) Water-based acrylics cure in 4-6 hours; Mod Podge takes up to 24 hours. Check manufacturer instructions. Avoid touching or moving the canvas.
Step 6: Apply Second Coat (10-15 minutes) Follow the same process as the first coat, working in thin, even strokes. Two thin coats are superior to one thick coat for durability and appearance.
Step 7: Final Curing (24 hours) Allow the second coat to cure fully before framing or displaying. Place the canvas in a dust-free environment away from high humidity, direct sunlight, and temperature fluctuations.
Applying Brush-On Sealers Without Losing Sparkle
Thick coats dull drills by creating heavy layers that reduce light reflection. Dilute your sealer about 10-15% with water to create thinner consistency that flows smoothly without brush marks. Apply in light, quick strokes, guiding the brush across the surface rather than pushing sealant into drills. Work in small 4-6 inch sections, keeping edges wet and blendable.
Using Spray Sealants for Even Coverage
Shake the can for the recommended time (typically 1-2 minutes). Hold 8-10 inches from the canvas and use smooth, even strokes in overlapping passes. Apply light, even coats rather than trying for full coverage in one pass.
Work in a well-ventilated area or outdoors. Wear a dust mask or respirator rated for organic vapors if working indoors. Allow 2-3 minutes between coats. Avoid spraying in high humidity or temperatures below 50°F, as this causes cloudiness.
Best Way to Seal Diamond Paintings: Comparing Methods
Brush-on sealers offer the most control and forgiveness for beginners. They're affordable and require minimal equipment, but require careful technique to avoid brush marks and take longer to cure.
Spray sealants provide the most professional appearance with zero brush marks, ideal for high-value pieces. The learning curve is steeper, and they require proper ventilation and protective equipment.
Glossy vs. Matte Finishes and Their Long-Term Effects
Glossy finishes enhance sparkle and depth, making colors appear more vibrant. They're ideal for AB (aurora borealis) or crystal drills but show fingerprints and dust more easily.
Matte finishes provide a softer, elegant appearance that reduces glare and hides dust better. They reduce sparkle somewhat but work well for solid-color drills or bright rooms where glare is problematic.
Both perform similarly long-term if using quality products. UV-protective sealants in both finishes cost slightly more but provide superior protection against yellowing, making them worthwhile for pieces displayed for decades.
Sealing Different Drill Types: AB, Crystal, and Resin
AB drills have iridescent coatings that can be affected by certain sealants. Water-based acrylics are safe; avoid resin-based sealers that can dull the coating. Apply thin coats to preserve color-shifting properties.
Crystal drills benefit from glossy sealants that enhance sparkle. They show brush marks readily, so use diluted sealer and thin coats.
Resin drills are durable and accept both water-based and resin-based sealers well. They benefit from matte finishes that reduce glare.
Solid-color drills are forgiving and work with any sealer type. If your painting contains mixed drill types, choose water-based acrylic sealer that works safely with all types.
What to Use to Seal Diamond Painting: Sealer Selection Guide
Water-Based vs. Resin-Based Sealers
Water-based sealers (Mod Podge and acrylic sealers) are most popular. They're non-toxic, easy to clean with water, and safe for indoor use. They dry clear and don't yellow significantly with quality brands. They work with all drill types and are beginner-friendly. The limitation is moderate UV protection compared to resin-based options.
Resin-based sealers offer superior UV protection and durability, creating harder, more scratch-resistant finishes lasting longer. They're ideal for pieces displayed for decades. Trade-offs include stronger fumes, careful handling requirements, longer curing (24-48 hours), and higher cost.
For most hobbyists, water-based acrylic sealers provide the best balance of protection, ease of use, and cost.
Eco-Friendly and Non-Toxic Sealer Alternatives
Plant-based acrylic sealers use natural resins instead of petroleum-based acrylics, performing similarly to traditional water-based sealers with lower VOC emissions.
Non-toxic water-based sealers are formulated without harmful chemicals like formaldehyde or phthalates. Safe for households with children or pets.
Low-VOC sealers meet strict emission standards, making them safer for indoor use. These eco-friendly options typically cost 10-20% more but offer peace of mind. Performance and durability equal traditional water-based sealers. Jeanne Argent Atelier recognizes that serious artists care about both craft and environment.
How Long Does Diamond Painting Sealant Take to Dry
Curing Times by Sealer Type
Mod Podge dries to the touch in 2-3 hours but requires 24 hours for full hardness.
Water-based acrylic sealers cure faster (4-6 hours to full hardness), allowing same-day second coats.
Spray sealants dry fastest (1-2 hours to full hardness), allowing multiple coats in one session.
Resin-based sealers take longest (24-48 hours to full hardness).
Temperature and humidity dramatically affect curing. Warmer temperatures (70-75°F) speed curing; cooler temperatures (below 60°F) slow it. High humidity (above 60%) extends curing and causes cloudiness. Ideal conditions are 65-75°F with 40-50% humidity.
Speeding Up Drying Without Damaging Your Work
Use a heat gun or hairdryer on low, held 6-8 inches above the canvas, passing slowly and evenly. Improve air circulation by opening windows or using a fan. Work in a warm room (70-75°F). Apply thinner coats rather than thick ones. Never force-dry immediately after application; heat is most effective 30-60 minutes after application.
How to Frame a Sealed Diamond Painting
Choose a frame with glass or acrylic fitting your painting's dimensions. Measure precisely, including any border you want to show.
Glass vs. acrylic: Glass provides better clarity and protection but is heavier and fragile. Acrylic is lighter and shatter-resistant but scratches more easily.
Use UV-protective glass or acrylic if displayed in sunlight. This prevents fading and yellowing of drills and canvas.
Mount the painting using acid-free mat board or foam board to create a border, preventing canvas from touching glass and allowing air circulation. Leave a small gap (1/8 to 1/4 inch) between canvas and glass to prevent moisture condensation. Seal the frame back with acid-free tape or backing paper to prevent dust and insects from entering. Hang away from direct sunlight, heat sources, and high-humidity areas.
Consider floating frames that display sealed paintings without glass, showcasing texture and three-dimensional drill quality.
Protecting your completed diamond painting with proper sealing transforms hours of careful work into a lasting masterpiece. Whether you choose simple Mod Podge application or professional-grade UV-protective sealer, investing in quality materials and careful technique pays dividends in longevity and appearance. Jeanne Argent Atelier creates premium diamond painting kits with superior canvas clarity and high-quality adhesives that hold drills securely. When you seal finished work with these techniques, you ensure artistic effort remains vibrant for decades.
Comparison Table: Sealing Methods and Their Characteristics
| Sealing Method | Drying Time | Best For | Skill Level | Cost |
|---|---|---|---|---|
| Brush-on Mod Podge | 24 hours | Beginners, budget-conscious | Easy | Low |
| Water-based acrylic sealer | 4-6 hours | General use, faster turnaround | Easy | Low-Medium |
| Spray sealant | 1-2 hours | Professional appearance, high-value pieces | Intermediate | Medium |
| Resin-based sealer | 24-48 hours | Maximum UV protection, long-term display | Advanced | High |
| Eco-friendly water-based | 4-6 hours | Environmentally conscious artists | Easy | Medium |
EXTERNAL SOURCES:
According to the National Center for Biotechnology Information research on polymer coatings, protective sealant layers significantly extend the lifespan of adhesive-based artwork by blocking UV exposure and moisture infiltration.
Research from the American Society for Testing and Materials standards on protective coatings shows that water-based acrylic sealers provide adequate protection for indoor display when applied in multiple thin coats.
The EPA guidelines on indoor air quality and VOC emissions recommend using low-VOC or non-toxic sealers when working indoors to maintain healthy air quality during and after application.
Frequently Asked Questions
Do you have to seal every diamond painting?
Not every diamond painting requires sealing, but it's highly recommended for finished pieces you want to preserve long-term. Sealing protects your drills from dust, moisture, and UV yellowing, and helps maintain sparkle and adhesion. If you plan to display or frame your work, sealing extends its lifespan significantly and prevents the canvas from yellowing over time.
How long does diamond painting sealant take to dry completely?
Drying times vary by sealer type. Water-based acrylic sealers typically dry in 2-4 hours, though full curing may take 24 hours. Spray sealants often dry faster (30 minutes to 2 hours), while resin-based or Mod Podge finishes can take 24-48 hours for complete hardening. Always check your sealer's instructions and avoid handling until fully cured to prevent tacky residue or air bubbles.
What's the best way to seal diamond paintings without losing sparkle?
Use a glossy, water-based acrylic sealer applied in thin, even layers with a foam brush to maintain maximum sparkle. Avoid over-application, which can create a cloudy finish and dull the drills. Brush-on sealers give you better control than spray, allowing you to preserve the diamond's natural shine. For best results, apply 1-2 thin coats rather than one thick coat.
Can you use Mod Podge to seal a diamond painting?
Yes, Mod Podge works as a sealer for diamond paintings, though it's not ideal for all situations. It provides good adhesion and protection but dries clear and can leave a slightly tacky feel if over-applied. Dilute Mod Podge with water (1:1 ratio) for easier brush application and to reduce the risk of air bubbles. It takes 24-48 hours to fully cure. Test on a small area first to ensure you're happy with the glossy finish.
This article was written using GrandRanker